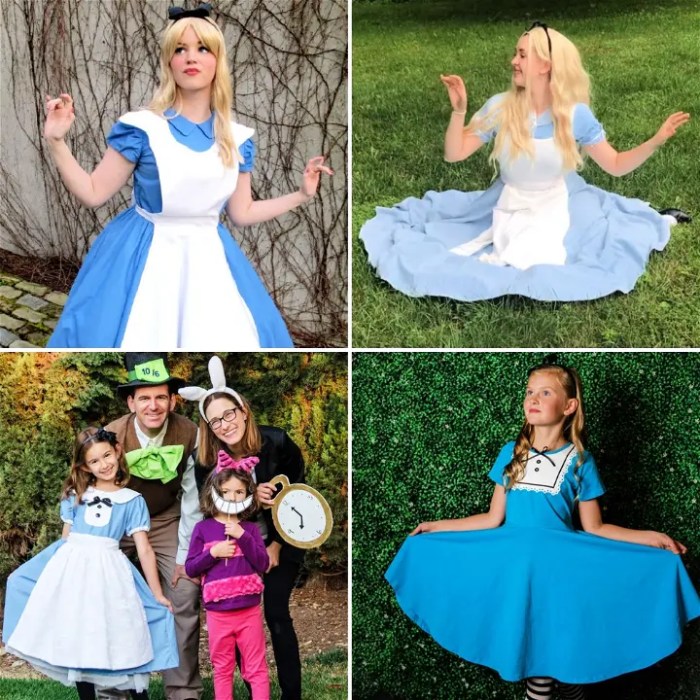
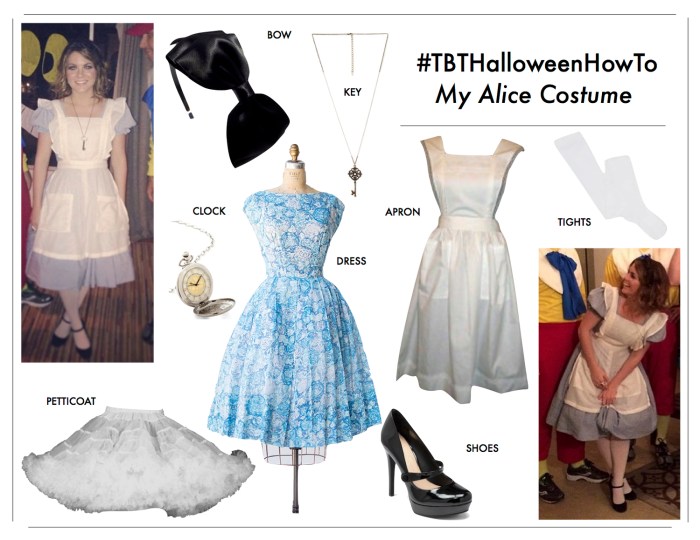
Material Sourcing and Preparation

Alice in wonderland diy costume – Creating a classic Alice in Wonderland costume involves gathering specific materials and preparing them for use. The success of your DIY project hinges on careful selection and pre-treatment of these fabrics to ensure a high-quality, durable, and visually appealing final product. This section details the necessary materials, preparation steps, and sustainable sourcing options.
Materials Needed for an Alice in Wonderland Costume
A classic Alice costume requires a combination of fabrics and embellishments. The quantities will vary depending on the child’s size and the desired level of detail. Consider purchasing extra fabric to account for potential mistakes or alterations.
- Blue and White Dress Fabric: Approximately 2-3 yards of lightweight cotton or chambray for the dress. Alternatives include linen or a cotton blend. Consider a blue gingham print for a more authentic look.
- White Apron Fabric: About 1 yard of white cotton or a similar lightweight fabric. A simple white cotton fabric will work well.
- Black Ribbon or Grosgrain: Several yards for the apron ties and potential embellishments on the dress. Alternatives include black bias tape or even black yarn.
- White Collar Fabric: A small piece of stiff white fabric, such as cotton or interfacing, for the Peter Pan collar.
- Black Shoe Polish (optional): For creating scuffed-looking shoes, if desired.
- Embroidery Thread (optional): White or blue embroidery thread for adding decorative details to the dress or apron.
- Buttons (optional): Small white buttons for the apron or dress.
- Pattern: A child’s dress pattern or a simple rectangular pattern that can be easily adjusted.
Fabric Preparation
Before starting the sewing process, preparing the fabrics is crucial for a professional finish and to prevent shrinkage or color bleeding.
- Pre-washing: All fabrics should be pre-washed and dried according to their care instructions. This step removes excess sizing, prevents shrinkage after construction, and ensures the colors are set. Pre-washing is especially important for cotton fabrics.
- Pre-treating Stains: Inspect the fabrics for any stains and treat them accordingly before washing. A stain remover can prevent permanent marks on the final garment.
- Ironing: After washing and drying, iron the fabrics to remove wrinkles and ensure smooth seams during construction. This step makes sewing easier and leads to a more polished result.
Sustainable and Environmentally Friendly Material Sourcing, Alice in wonderland diy costume
Choosing sustainable materials is an excellent way to minimize the environmental impact of your costume creation.
- Thrift Stores and Secondhand Shops: Repurposing existing fabrics from thrift stores is a highly sustainable option. You can find suitable materials like cotton sheets, tablecloths, or even old clothing items that can be easily transformed into costume components. This reduces textile waste and lowers the overall cost of the project.
- Organic Fabrics: Opting for organic cotton or other organically grown fabrics ensures that the materials are produced with environmentally friendly practices, minimizing the use of harmful pesticides and chemicals.
- Local Fabric Stores: Supporting local businesses reduces transportation emissions and allows you to personally inspect the quality and origin of the materials. Many local fabric stores carry a variety of sustainable options.
- Upcycled Materials: Consider using upcycled materials such as old lace, ribbons, or buttons to add unique details to your costume. This not only reduces waste but also adds a touch of personal creativity.
Construction Techniques and Tutorials: Alice In Wonderland Diy Costume

Creating an Alice in Wonderland costume involves several key construction steps. This section details the process of making the bodice, apron, and dress pattern, providing clear instructions and visual descriptions to guide you through the process. Remember to always pre-wash your fabric before beginning construction to avoid shrinkage after completion.
Bodice Construction
The bodice is the foundation of the Alice dress. We’ll create a simple, fitted bodice using a basic pattern. Imagine a rectangular piece of fabric, slightly longer than your torso and wide enough to wrap around comfortably. This rectangle will be shaped and fitted to your form.First, measure your bust circumference and desired bodice length. Add seam allowances (approximately ½ inch on all sides) to these measurements.
Cut your fabric to these adjusted dimensions. Fold the fabric in half lengthwise, right sides together. Sew the side seams, leaving a small opening at the shoulder for ease of fitting. Next, create a neckline by cutting a gentle curve across the top edge. You can use a pre-existing pattern or freehand this curve.
Hem the neckline and armholes. Finally, consider adding boning or stays to the bodice sides for extra structure, if desired. This is optional, but it will give the bodice a more polished and period-appropriate look. The boning can be easily sewn into the seam allowances along the side.
Apron Construction
The apron is a simple rectangle, slightly longer than the bodice. Measure from your waist to the desired apron length. The width should be twice the desired width of your apron plus seam allowances. Cut your fabric to these measurements. Fold the fabric in half lengthwise, right sides together.
Sew the side seams, leaving the top edge open. Hem the bottom edge. For the top edge, create a simple casing by folding over approximately 1 inch of fabric and sewing it closed, leaving a small opening to thread a ribbon or cord through to tie the apron.
Alice Dress Pattern Design
Designing a custom-fit Alice dress pattern requires basic pattern-making skills. Start by drafting a basic bodice block, using your own measurements. This involves creating a front and back bodice pattern piece. These pieces are shaped to fit the contours of your body, providing accurate measurements for bust, waist, and hips.For the skirt, create a simple rectangular shape. The length should be determined by your desired skirt length, and the width should be calculated to achieve the desired fullness.
A simple calculation is to measure your waist circumference and multiply it by 1.5 to 2, depending on the desired fullness. Remember to add seam allowances to all pieces. The skirt can be gathered or pleated to create volume. The bodice and skirt are then joined together at the waistline. You can create a simple seam or add a waistband for a more finished look.
The pattern pieces can be adapted to different sizes by adjusting the measurements accordingly. For instance, increase the width and length of the bodice and skirt pieces to accommodate larger sizes. For smaller sizes, simply reduce the measurements proportionally. Remember to maintain the proportions between the different pattern pieces to ensure a well-balanced and well-fitting dress.
Crafting an Alice in Wonderland costume is a delightful journey, a whimsical dance with creativity. Yet, sometimes, a touch of the unexpected adds a delightful twist. For those seeking a bolder contrast, consider the chilling artistry involved in a diy jason voorhees costume , a testament to resourceful imagination. Returning to the enchanting world of Alice, remember the joy of bringing your unique vision to life, no matter how fantastical or frightful it may be.
Photography and Presentation

Capturing the magic of your handmade Alice in Wonderland costume requires a thoughtful approach to photography and presentation. A well-executed photoshoot and strategic online sharing can showcase your creativity and craftsmanship effectively, potentially even inspiring others to embark on their own costume-making adventures. This section Artikels key steps to achieve a captivating presentation of your finished costume.
Photoshoot Concept
The photoshoot should evoke the whimsical and slightly surreal atmosphere of Wonderland. Imagine a setting that blends elements of a fairytale garden with a touch of Victorian-era charm. A location with overgrown greenery, perhaps a park with mature trees and dappled sunlight, would create a fantastic backdrop. Alternatively, a more controlled environment like a studio with carefully chosen props (oversized teacups, playing cards, whimsical clocks) could also work exceptionally well.
The lighting should be soft and diffused, avoiding harsh shadows that might detract from the costume’s details. A slightly desaturated color palette, with a focus on muted greens, blues, and purples, would enhance the dreamy, otherworldly feeling. The overall aesthetic should be elegant yet playful, reflecting the duality of Alice’s journey. The mood should be one of enchanting mystery and playful curiosity.
Effective Costume Photography
To effectively photograph your costume, consider these steps:
- Background Selection: Choose a background that complements the costume without overpowering it. A busy background can distract from the details of the costume, while a plain background can make the costume appear flat. The ideal background should subtly enhance the overall aesthetic.
- Posing: Experiment with different poses that showcase the costume’s details and evoke the spirit of Alice in Wonderland. Consider poses that are both playful and elegant, reflecting Alice’s journey from a curious child to a more self-assured young woman. Think about incorporating props like a teacup or a playing card to add visual interest and context.
- Lighting: Use soft, diffused lighting to avoid harsh shadows and highlight the costume’s textures and colors. Natural light, especially during the golden hour (the hour after sunrise or before sunset), can create a magical atmosphere. If using artificial lighting, consider using softboxes or diffusers to soften the light.
- Photography Techniques: Utilize a variety of shots – full-body shots to showcase the entire costume, close-up shots to highlight intricate details, and creative angles to capture the overall mood and atmosphere. Experiment with depth of field to draw attention to specific elements of the costume.
Costume Presentation Methods
Several platforms can effectively showcase your Alice in Wonderland costume.
- Portfolio Website: A dedicated portfolio website allows you to present your costume in a professional and organized manner. This is a great option if you’re aiming for a more formal presentation, perhaps to showcase your skills to potential clients or employers.
- Blog Post: A blog post offers a more informal and engaging way to share your costume creation journey. You can include details about the design process, material sourcing, construction techniques, and the photoshoot experience. This allows you to connect with a wider audience and share your passion for crafting.
- Social Media Presentation: Platforms like Instagram, Pinterest, and TikTok are ideal for sharing visually appealing content. Use relevant hashtags to reach a wider audience and engage with other costume enthusiasts. High-quality images and engaging captions are crucial for successful social media presentation. Consider creating short videos showcasing the costume’s details and movement.
General Inquiries
What if I don’t know how to sew?
Many elements of the costume can be adapted for no-sew methods using fabric glue, iron-on patches, or pre-made components. Focus on simpler designs or consider collaborating with a friend who sews.
Where can I find affordable fabrics?
Thrift stores, online fabric marketplaces, and discount fabric outlets are excellent sources for affordable and sometimes unique fabrics. Consider repurposing old clothes as well.
How can I make the costume child-friendly?
Opt for softer, less restrictive fabrics. Simplify the design and construction for easier movement. Prioritize safety by avoiding small, detachable parts that could pose a choking hazard.
How long will it take to make the costume?
The time required varies greatly depending on the complexity of the chosen design and your sewing experience. Allow ample time, especially for intricate details like the wig and accessories.
